


STACKING STAR TRAILS USING STARSTAX
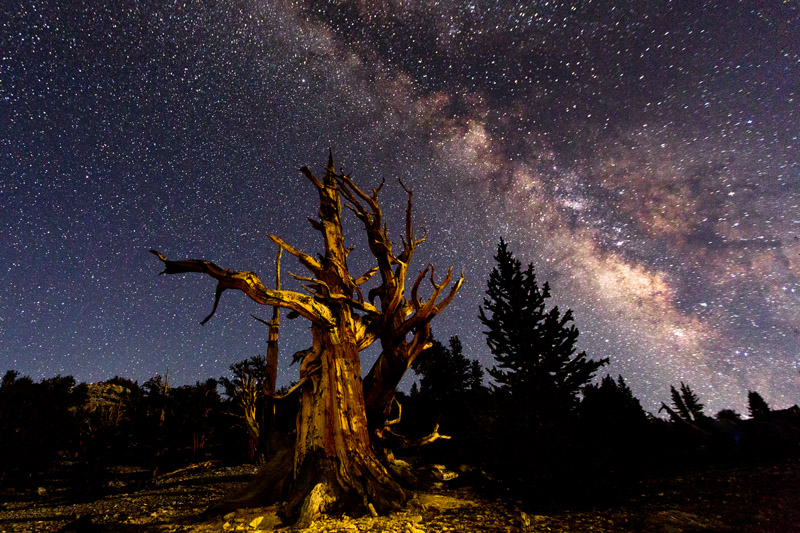
Becoming more and more popular these days with the ability of camera bodies to shoot with low noise at high ISOs is Milky Way and star trails images. Previously to get a good star trails shot a cable release was used and it would be locked in for 30 minutes or longer to capture the movement of the stars. In the days of film, lots of colors in the stars were brought out but in the early days of digital all of the colors disappeared and it was just white streaks going through the sky as sensors just weren't strong enough to pick this up. That has now change,d as a lot more color in the stars is evident with a digital camera with a selection of shots stacked together rather than with one long exposure. You also get less noise in the final shot with it being a series of images rather than one very long exposure.
The best program currently on the market for doing this is called StarStaX. This is a free application and works on both the Mac and PC platform. It's available at http://www.markus-enzweiler.de/software/software.html. There is another free program available online at http://www.startrails.de/html/software.html but it only works on PC and as my desktop is a Mac I opted for the first one. The StarStaX site also has an Instruction and Tutorial page that can be downloaded on how the program works and the creators preference for settings.
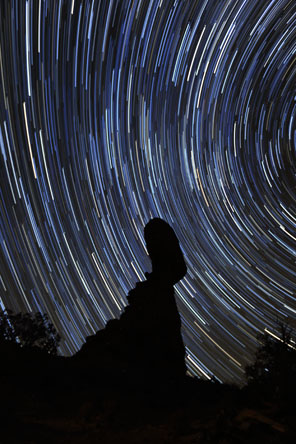 Balanced Rock - Arches National Park. 108 images with settings of 30 seconds for each exposure, ISO of 1600, f/2.8 and a White Balance of 3900 Kelvin. Notice all of the colors that are visible in the stars. |
CONVERT FILES TO JPEG AND RESIZE. StarStax is very easy to use and does pretty much all of the work for you. The one drawback is that is does not work on RAW files so the collection of images first have to be converted to jpeg but there are several options for doing this fairly easily. You can choose to first convert with one program and then resize with another or if you have a program that will do both it's best to do this. Using a smaller image size will make the process in StarStaX go faster but you can keep them the original size to produce a larger resolution image so that some post production work can be done in Adobe Camera Raw or Lightroom with not much data loss. For the PC, a great program for batch conversion is BreezeBrowser. Digital Photo Pro, a Canon utility program, allows for both steps to be done at once. In DPP use File > Convert and Save. Other options for doing a batch conversion are found in Bridge and Lightroom. If going the route of just doing a file conversion and then wanting to do a batch resize in another program, Multiple Image Resizer is a great program, also free, that does a good job of doing this for this process or any project you have for changing the dimensions and / or resolution of a large group of files.
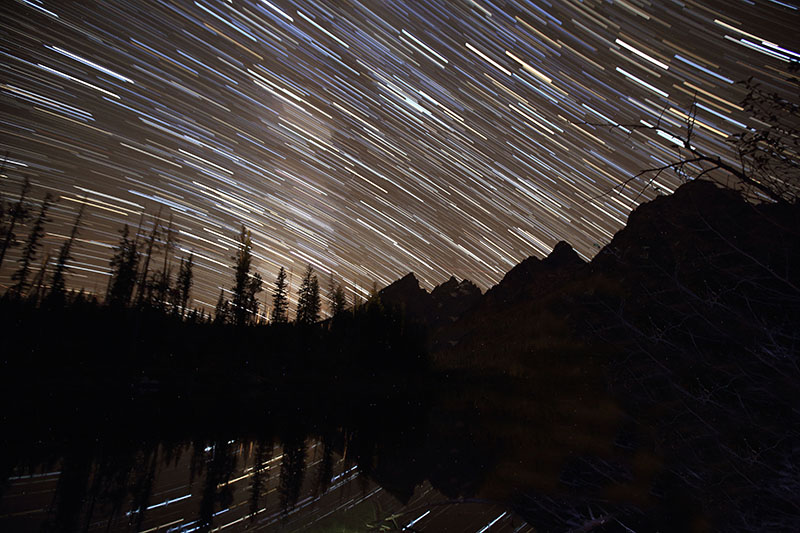 Experiment with a calm lake in the foreground to get some stars trailing through the water. Not all will show up tough. |
PREFERENCE TABS IN STARSTAX. After opening the program, there are three Preference tabs - Blending, Images and General. There isn't much in General that applies to the actual use of the program. Under Images, it has the option of Fast, Smooth and Automatic. Testing with these showed that Smooth is very much the preferred option.
In the Blending tab, there are a variety of options including Lighten, Gap Filling, Darken, Add, Subtract, Multiply and Average. Testing with these proved that either Lighten or Gap Filling worked best as the others produce mixed results with the final image. Once you have chosen your options process the file and you will see the image building as each frame is added to the growing stack. After completion, there is a button on the right side of the window for going to the Tools section that is geared for Gap Filling if that was the option chosen. Like most things in photography, personal preference varies so it's best to do a little bit of testing to see which blending style is preferred.
In the Tool associated with Gap filling, Threshold, Amount of Gap Filling and Brightness can be adjusted. Slight adjustments for your own preference can be used before saving the file. After numerous tests, I found a Threshold of just to the Low side and an Amount just to the More side worked best to fill in any gaps that might have occurred between clicks of the shutter. There is very little difference in the saved file for viewing on the computer for Lighten or Gap Filling using Smooth but Gap Filling does a little better job for making a print.
The images below show the final results as well as the camera settings used for each of the individual shots. Gap Filling was used for the building of each of the stacks.
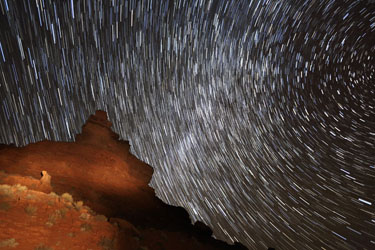 Valley of the Gods. 44 images with 20 second exposures, 4000 ISO, f/2.8, White Balance of 4000 Kelvin. The direction shot contained the Milky Way so thus the thickness of it with having used an ISO of 4000 which picks up a lot more light for a given exposure than a lower ISO such as with the shot of Balanced Rock. 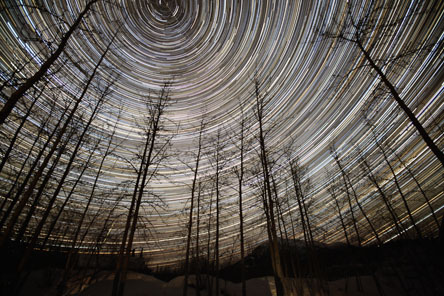 376 images with 25 second exposure, 3200 ISO, f/2.8, White Balance of 4500 Kelvin. Camera set up after a very slow aurora borealis night in northern Alaska. The camera took more shots than this but the light started coming up making the sky too bright. 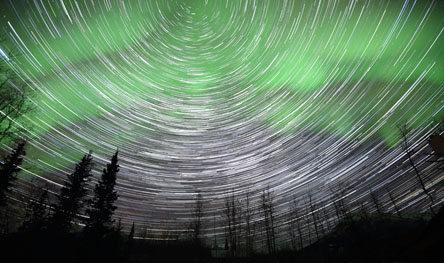 198 images with 15 second exposure, ISO f/2.8, Auto White Balance The aurora borealis in this stack showed up in about 60 of the images. |
If a warmer sky is preferred, use a higher Kelvin or either a Daylight or Cloudy White Balance setting. You can also change the output shot in Camera Raw or Lightroom to see what temperature and color of sky looks best. I tend to like the cooler sky as it still brings out individual colors in the stars, especially at the lower ISO. As with all photography, the preference is yours, so you can go with what you like best.
With using Camera Raw, I also like to use the Blacks slider to help darken the sky a little bit to help bring out the contrast between the stars and the sky. As with most techniques, experimentation is always a good thing but having a base from which to start is beneficial and this should get you started in the right direction.